GraphQL and MongoDB are two modern technologies that developers love. In this guide, I am going to show how you can easily set up a GraphQL API layer for your MongoDB using Space Cloud in a couple of minutes.
The keyword to note here is instant. Which means you won’t have to write a GraphQL backend yourself. Sounds like a magic right? Let me explain it to you in a minute.
Table of contents
- MongoDB and GraphQL intro
- What is Space Cloud?
- What if I don’t use MongoDB?
- Getting started with GraphQL and MongoDB
- Setup
- Running GraphQL queries on Space Cloud
- Conclusion
MongoDB and GraphQL Intro
MongoDB is one of the most popular NoSQL databases out there. The developer agility provided by the schemaless nature of MongoDB is one of the biggest reason for its widespread adoption. Not to forget that MongoDB is also highly scalable as compared to a traditional relational database. If you have a heavy write workload with an evolving schema, then MongoDB might be ideal for you.
GraphQL, on the other hand, is a query language for your APIs, gradually replacing REST. It allows you to describe your data needs precisely and provides you with the exact data you had asked for, solving age-old under fetching and over fetching problems. If you are new to GraphQL and want to learn more about it, check out its official site.
However, to avail these excellent benefits, you need to set up a GraphQL API on the backend by writing resolvers. Having to write a GraphQL server adds friction to its adoption. While there are many GraphQL implementations for SQL databases, most of them require you to have a schema and don’t work out of the box with MongoDB because of its schemaless nature. That’s where Space Cloud comes into the picture by providing schemaless GraphQL APIs for your MongoDB without writing a backend. So, let’s see what Space Cloud is all about.
What is Space Cloud?
To keep things simple,
Space Cloud is an open-source, serverless platform to develop, secure and scale your applications. It provides instant GraphQL and REST APIs on top of any database and microservice.
The coolest part about Space Cloud is that the database APIs are realtime. i.e. You can optionally subscribe to changes in the database. This functionality comes in handy while adding realtime functionalities to your app.
Since Space Cloud also has a robust security module built into it, you can consume these APIs directly from the frontend. So in most use cases, just making an Angular or React app using the Space Cloud APIs should be the only code you write!
What’s more? You can deploy your existing HTTP workloads to Kubernetes/Docker using Space Cloud via a single command. Space Cloud will automatically scale these workloads including scale down to zero. It will also take care of end to end encryption, traffic splitting and much more! Checkout all the features of Space Cloud
Already in love with Space Cloud? Show your support ❤ by giving us a star on Github.
What if I don’t use MongoDB?
Space Cloud provides GraphQL APIs for MongoDB, Postgres, SQL Server and MySQL (and their compatible databases) out of the box. If you use any other database apart from MongoDB, then these guides can help you get started:
Cool, that’s enough of history and features. Let’s dive straight into it!
Getting started with GraphQL and MongoDB
In this guide, we are going to build a simple blogging application on top of MongoDB, which has authors and posts.
Each author can have multiple posts, whereas a post can only belong to a single author. Note that this is a one-to-many relation.
Note: Don’t worry if you get stuck somewhere. You can always ping me on our Discord channel.
Setup
We are using space-cli to run both Space Cloud and MongoDB for us.
Step 1: Install the space-cli
space-cli is the cli tool for Space Cloud. You can download a version for your particular platform:
Unzip the compressed archive.
For Linux / Mac: unzip space-cli.zip && chmod +x space-cli
For Windows: Right-click on the archive and select extract here.
Copy the space-cli binary to your environment path variable for global usage.
For Linux / Mac: Copy the space-cli to /usr/local/bin. You may have to use sudo depending on the permissions of your /usr/local/bin.
For Windows: Add the path of the space-cli.exe to the environment variable PATH for making space-cli accessible globally.
To make sure if the space-cli binary is installed correctly, type the following command:
For Linux / Mac: space-cli --version
For Windows: space-cli.exe --version
This prints the space-cli version.
Step 2: Run Space Cloud & MongoDB
We can set up all Space Cloud components (gateway and runner) via space-cli using a single command.
space-cli setup --devThe setup command selects Docker as a target by default and runs all the containers required to setup Space Cloud. On successful installation it generates an output similar to this one:
INFO[0000] Setting up Space Cloud on docker.
INFO[0000] Fetching latest Space Cloud Version
INFO[0000] Starting container space-cloud-gateway...
INFO[0000] Image spaceuptech/gateway:latest already exists. No need to pull it again
INFO[0000] Starting container space-cloud-runner...
INFO[0000] Image spaceuptech/runner:latest already exists. No need to pull it again

INFO[0001] Space Cloud (id: "local-admin") has been successfully setup! 👍
INFO[0001] You can visit mission control at http://localhost:4122/mission-control 💻
INFO[0001] Your login credentials: [username: "local-admin"; key: "KkYr6FvgYsvr"] 🤫
Verify Space Cloud installation
Verify the installation by running the following docker command:
docker psYou should see an output similar to this:
CONTAINER ID        IMAGE                        COMMAND             CREATED              STATUS              PORTS                                            NAMES
507ce4042486        spaceuptech/runner:latest    "./app start"       About a minute ago   Up About a minute                                                    space-cloud-runner
33a5a7a9be3a        spaceuptech/gateway:latest   "./app run"         About a minute ago   Up About a minute   0.0.0.0:4122->4122/tcp, 0.0.0.0:4126->4126/tcp   space-cloud-gateway
Run MongoDB
We will be running a fresh MongoDB database in this guide. However, you can even add your existing databases to Space Cloud.
We can run MongoDB database inside a docker container via space-cli using the following command:
space-cli add database mongo --alias mongoIt might take some time if you did not have the mongo image cached locally.
Once we have started MongoDB, we need to know its IP address. Luckily, the space-cli add database command also creates a domain name for our database, which is of the following format:
<alias-name>.db.svc.cluster.localSince we had set the –alias to mongo in the add database command, the domain name for our MongoDB translates to:
mongo.db.svc.cluster.localStep 3: Configure Space Cloud
If you exec into docker container of Space Cloud’s gateway, you can see a config.yaml file generated by gateway in the /app directory.
Space Cloud needs this config file to function. The config file is used to load various information like which databases to use, their connection strings and security rules.
Space Cloud has it’s own Mission Control (admin UI) to configure all of this quickly.
Open Mission Control:
Head over to http://localhost:4122/mission-control to open Mission Control.
Note: Replace
localhostwith the address of your Space Cloud if you are not running it locally.
Create a project:
Click on Create a Project button to open the following screen:
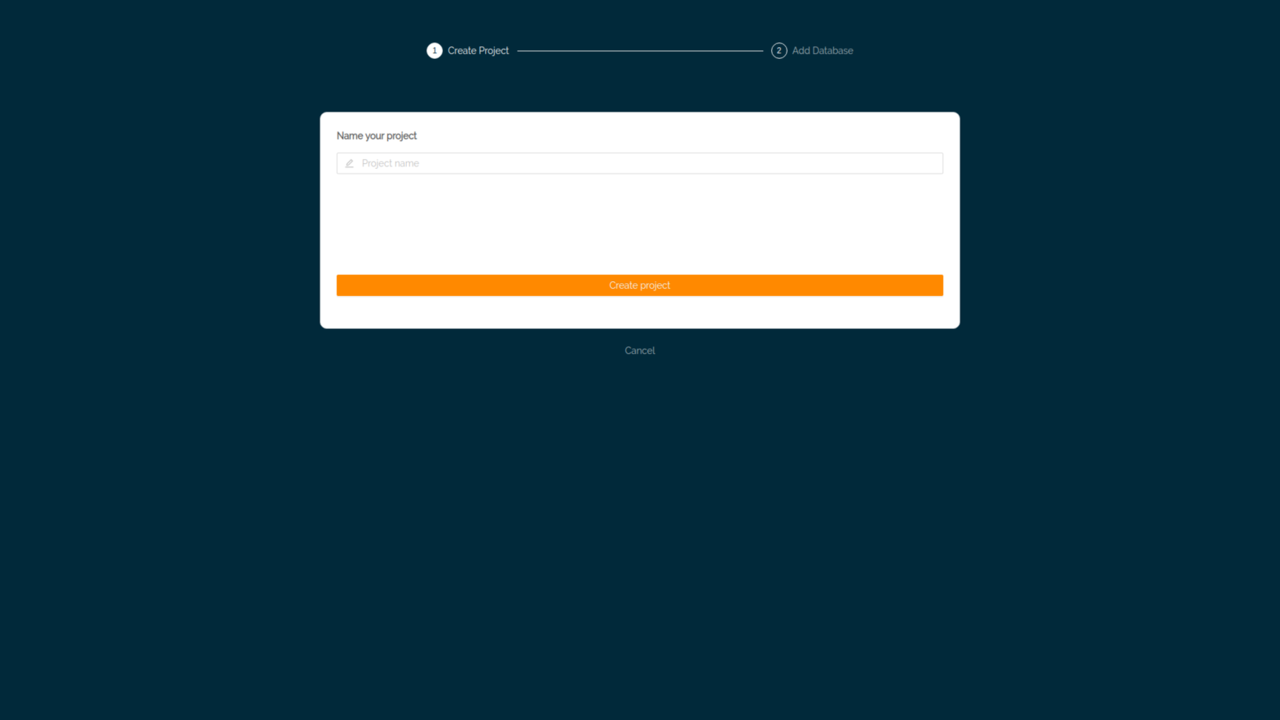
Give a name to your project.
Hit Create Project button to create the project.
Add database to your project
After creating the project, the next step is to add a database to your project:
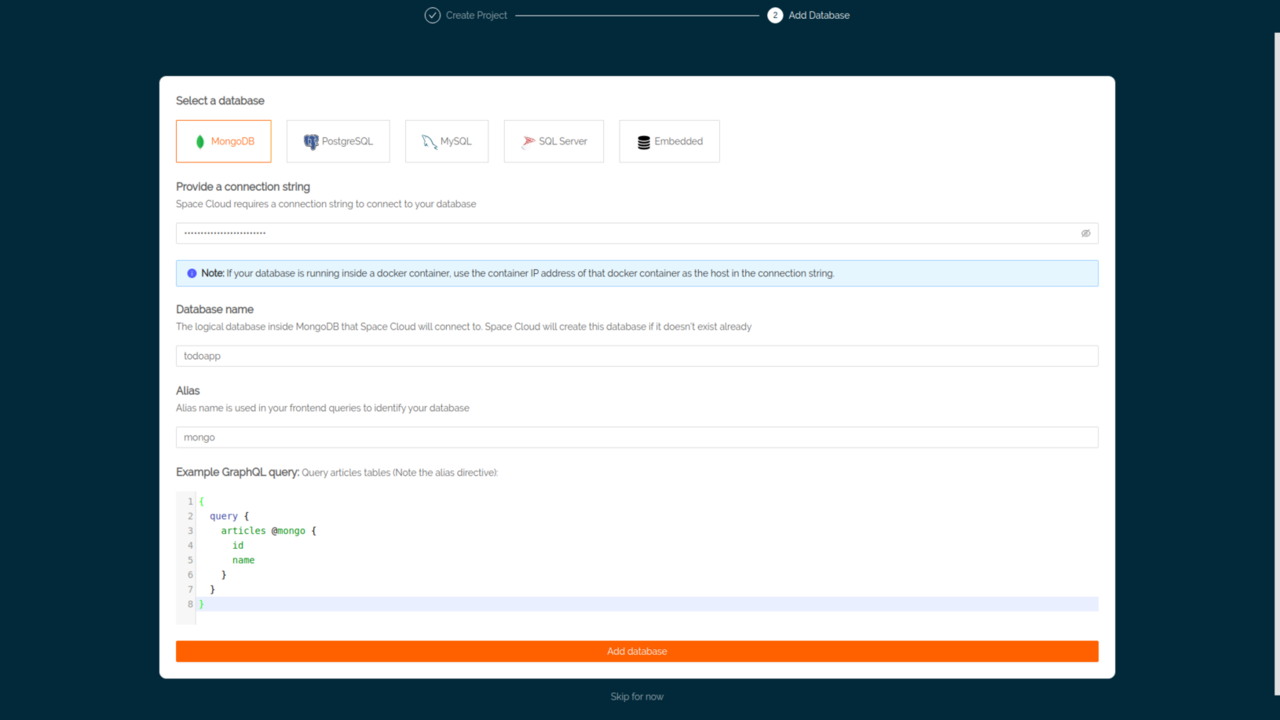
Keep MongoDB as the selected database.
Replace localhost with the domain name we noted earlier to get the final connection string as:
mongodb://mongo.db.svc.cluster.local:27017Hit Add database button.
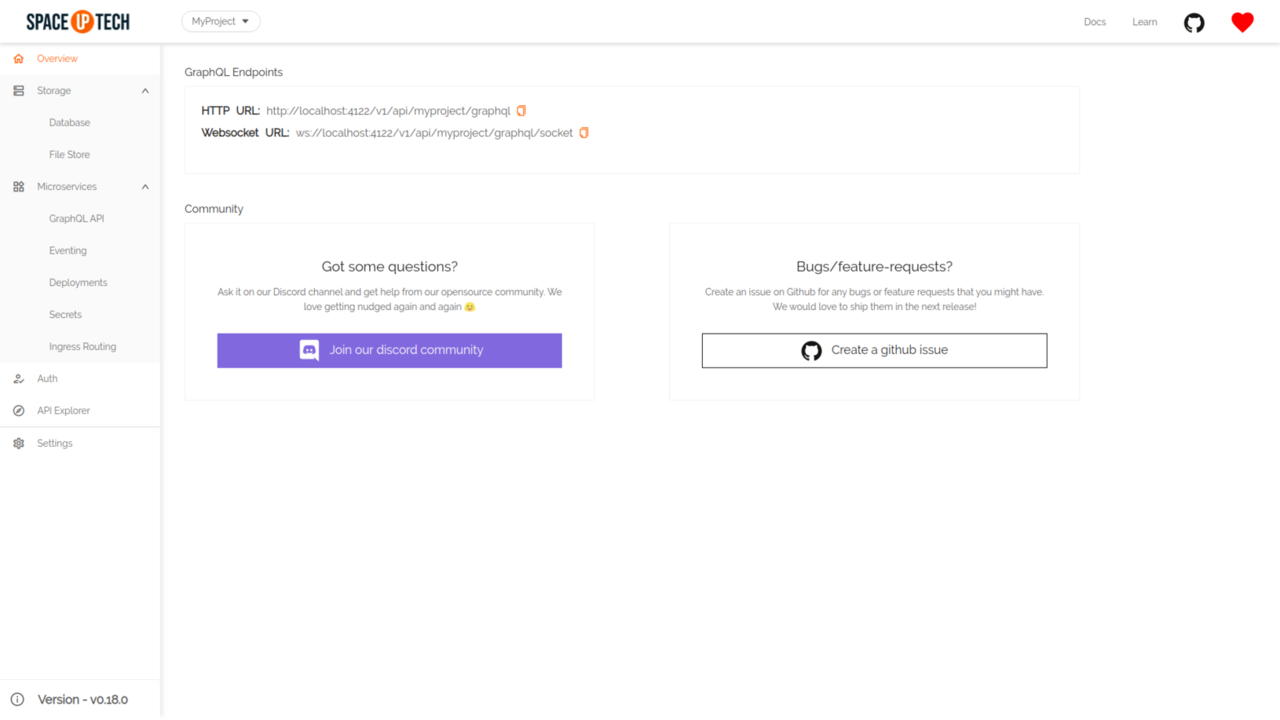
If the connection was successful, you would get a notification for a successful connection. After that you would be directed to the overview page of your project:
Adding collection:
To expose a collection via GraphQL, we first to need to add it to Space Cloud’s config.
Head over to the Overview tab in the Database section.
Click on the Add collection button to open the following form:
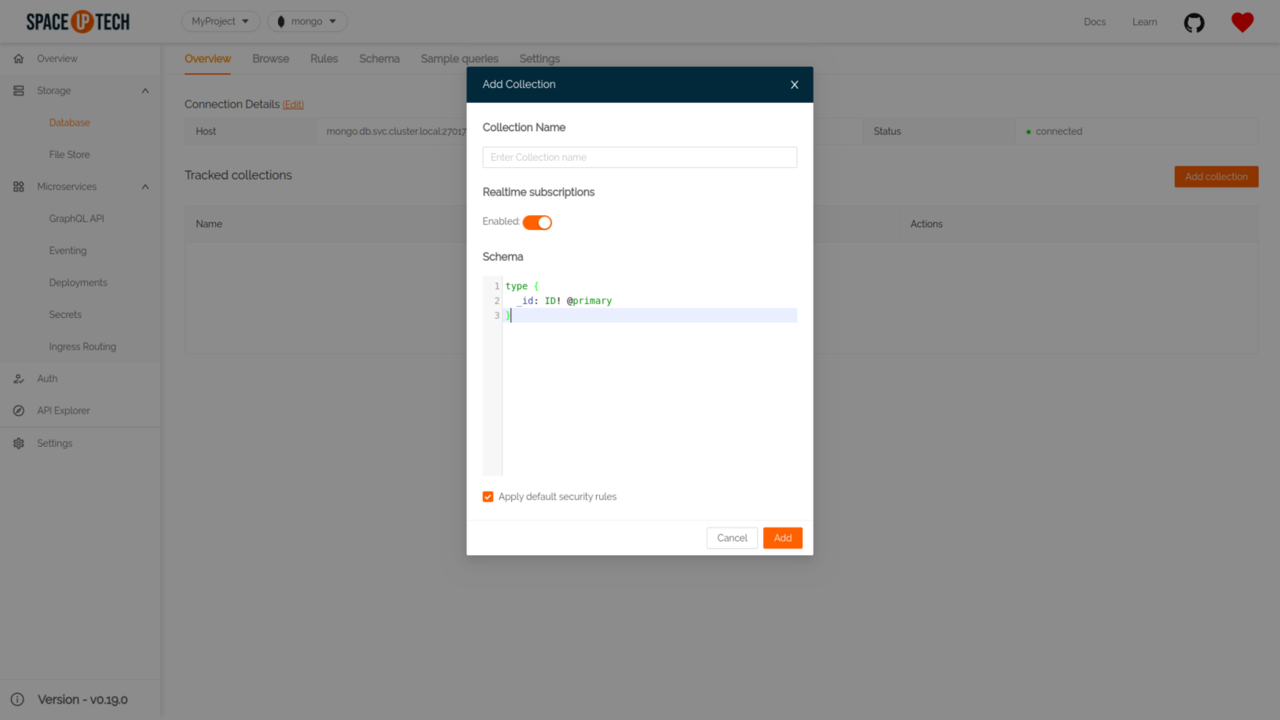
Give your table name as author.
The Schema field is used to optionally define the schema of a collection. Leave it as it is.
Hit the Add button.
Similarly, create post table.
Great! That’s it. Time to play around with GraphQL and Mongo!
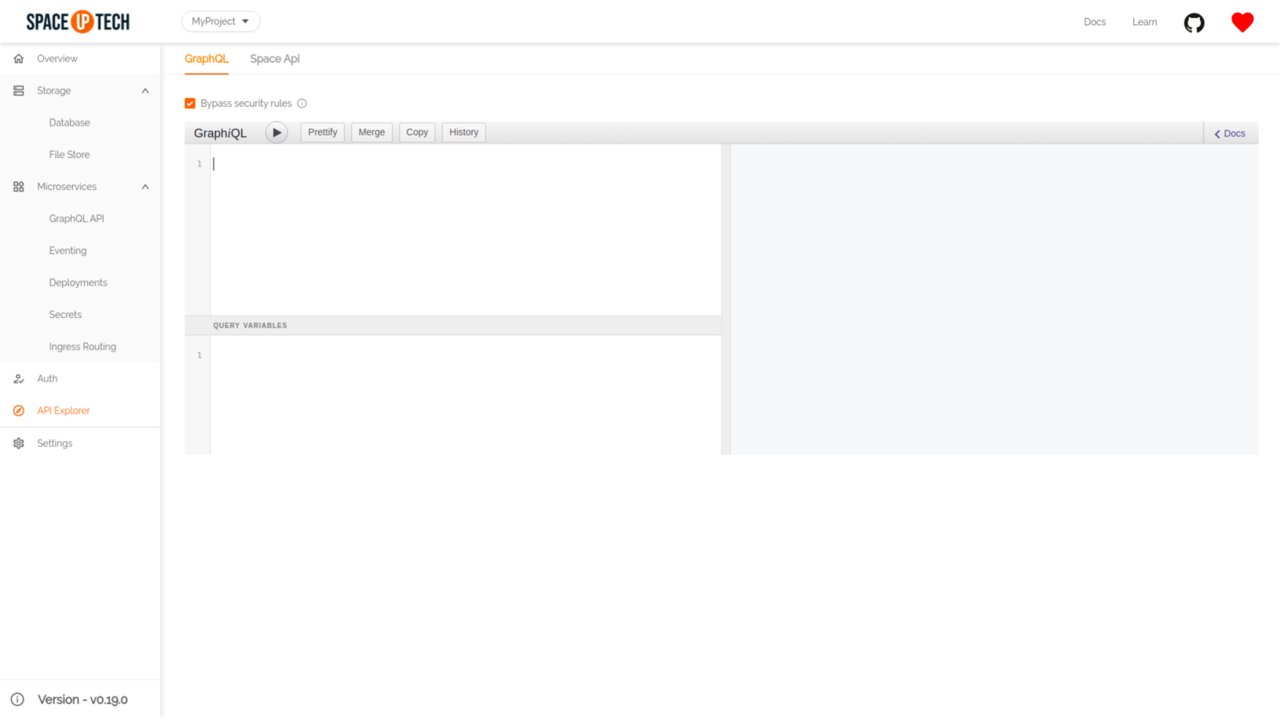
Running GraphQL queries on Space Cloud
Mission Control has an embedded GraphiQL IDE which lets us fire queries without having to build a frontend.
Head over to the Explorer section.
Let’s start by creating some authors and posts, which translates to inserting a few documents in your MongoDB.
Inserting data
Inserting data into our MongoDB is as simple as firing a GraphQL query for us. Try running the following GraphQL query to create few authors:
mutation {
 insert_author(
   docs: [
    { _id: "1", name: "Dan"},
    { _id: "2", name: "Ryan"}
  ]
 ) @mongo {
   status
   error
 }
}
On successful insert, you should be able to see the status as 200 which means you have successfully inserted the documents in your MongoDB.
The docs argument is nothing but the array of documents that you want to insert in your collection.
If you have noticed, we have used a @mongo directive in the above query. Replace it with whatever alias name you have kept while adding the database in Mission Control.
Inserting posts should be a no brainer now. Just run the following GraphQL query to insert some posts:
mutation {
 insert_post(
    docs: [
      { _id: "1", author_id: "1", title: "Introducing Hooks" },
      { _id: "2", author_id: "1", title: "React vs Vue" },
      { _id: "3", author_id: "2", title: "Context API" },
      { _id: "4", author_id: "2", title: "React + Redux" }
    ]
 ) @mongo {
   status
   error
 }
}
Querying data with filters
Having inserted authors and their posts, let’s try to query posts of a particular author. It’s nothing but a filtering operation.
Try running the following query in the GraphiQL editor:
query {
 post (
   where: {author_id: "1"}
 ) @mongo {
   _id
   title
 }
}
As you can see, we only got the posts that belonged to author_id 1. Check out this guide for a complete list of filtering options.
Updating data
Updates require two information - a where clause to filter the documents to be updated and at least one update operator.
Let’s say you want to update the name of a particular author in your MongoDB. Here’s a GraphQL query to do it:
mutation {
 update_author (
   where: { _id: "2"},
   set: {name: "Ryan Florence"}
 ) @mongo {
   status
   error
 }
}
You can also perform various operations like incrementing, decrementing, multiplying. Check out this guide for a complete list of update operations.
Performing joins
Now comes the fun part, i.e. Performing join operations on your MongoDB directly from the frontend. Joins are used to fetch data for a type along with data for a related type.
Note: MongoDB does not provide joins out of the box. However, Space Cloud makes it possible to perform joins via its GraphQL API.
Let’s say we want to show a list of authors along with the title of their posts. In essence, it’s a database join operation. Here’s how you would do it using Space Cloud:
query {
 author @mongo {
   _id
   name
   post(
     where: {author_id: "author._id"}
   ) @mongo {
     title
   }
 }
}
The response should look something like this:
{
  "authors": [
    {
      "_id": "1",
      "name": "Dan",
      "post": [
        {
          "title": "Introducing Hooks"
        },
        {
          "title": "React vs Vue"
        }
      ]
    },
    {
      "_id": "2",
      "name": "Ryan Florence",
      "post": [
        {
          "title": "Context API"
        },
        {
          "title": "React + Redux"
        }
      ]
    }
  ]
}
Notice how we are matching the parent query’s result authors._id with the nested query’s field author_id to perform a join operation. Read more about joins.
Note: Space Cloud optimizes the number of queries made to the database for fetching such kind of relational data using a pattern called dataloader.
Conclusion
Setting up GraphQL on MongoDB isn’t that difficult. Just point Space Cloud to a MongoDB instance are you are good to consume GraphQL in your applications.
As an advantage, GraphQL opens up tons of new possibilities like performing joins on MongoDB which doesn’t provide joins out of the box. We are very excited about it and are going to double down on making our GraphQL support more robust.
The future, however, seems to be amazing. With the ability to do cross-database joins with MongoDB and other SQL databases mean we can build enterprise-grade apps that leverage the best of both worlds.
Show your support❤️ by giving it a star on Github.