Today, we are going to burst one of the biggest myths of GraphQL - “it requires a schema” and see how you can set up a schemaless GraphQL backend in minutes! But before we dive in, let’s take a closer look at what GraphQL is.
What is GraphQL?
GraphQL is a query language for APIs that is being used by Facebook since 2012 as an alternative to REST. In 2015, they open-sourced it, and since then it took the world by storm.
In GraphQL, you send a query string to your backend describing all the data that you want. For example, in order to fetch the title and published_date fields of all articles of a particular author, you can send such a GraphQL query to your backend :
query {
 articles(where: {author_id: "dan_abramov"}) {
  title,
  published_date
 }
}
The above GraphQL query will resolve to a response whose structure mirrors that of the GraphQL request:
{
 "articles": [
  {
   "title": "Instant GraphQL APIs on MySQL",
   "published_date": "2019-11-21"
  },
  {
   "title": "How to build scalable apps",
   "published_date": "2018-11-10"
  }
 ]
}
GraphQL gives the power to frontend developers to choose what data they want precisely.
The GraphQL backend is smart enough to resolve the data dynamically in runtime to satisfy the needs of the GraphQL clients.
Analyzing the advantages of GraphQL
I won’t be going into the details of why GraphQL is so awesome. I believe that GraphQL advocates have done a great job at marketing GraphQL already. I am just listing down its main advantages for the analysis of schemaless GraphQL:
- No under fetching and over fetching
- Solves N+1 querying problems on frontend
- Rapid application development
- Built-in type checking and validation
- Self-documenting
Most of the benefits of GraphQL arises out of two reasons:
- Query language: It’s a query language as compared to REST which is just a pattern. Majority of the problems like over fetching, under fetching, N+1 problem are solved by the fact that you can describe what you want in a single query
- Schema: A strongly typed schema helps type-checking, validations and self-documentation
If you notice carefully, the major benefits of GraphQL arises from the fact that it is a query language. However, almost all libraries to build GraphQL servers force you to provide a schema. No, I don’t intend to start schema vs schemaless wars here😅, but what I am hinting at is that if you are a schemaless fan, you can still use GraphQL for majority of its benefits while sticking to a schemaless nature😇.
But why schemaless?
While many will argue against a schemaless API, they can’t deny the fact that schemaless has a big fanbase, especially for the following reasons:
- Ease of use
- Rapid prototyping
- Easier to evolve/migrate schema
Schemaless design helps you move fast when you anticipate things to evolve. And they are so popular for their ease of use, that an entirely new breed of schemaless databases evolved and got loved like MongoDB, CouchDB, DynamoDB, OrientDB.
So if you are already using one of the schemaless databases like Mongo, it doesn’t make any sense to provide a schema to GraphQL because the reason you chose a schemaless database in the first place was that you didn’t want a schema! That’s where having schemaless GraphQL provides benefits.
Going schemaless
GraphQL is a specification, not an implementation.
That’s the best thing Facebook did when open-sourcing GraphQL, they introduced it as a specification and not an implementation. This fact meant that people could come up with their custom implementations.
Following is the architecture for implementing your schemaless GraphQL backend:
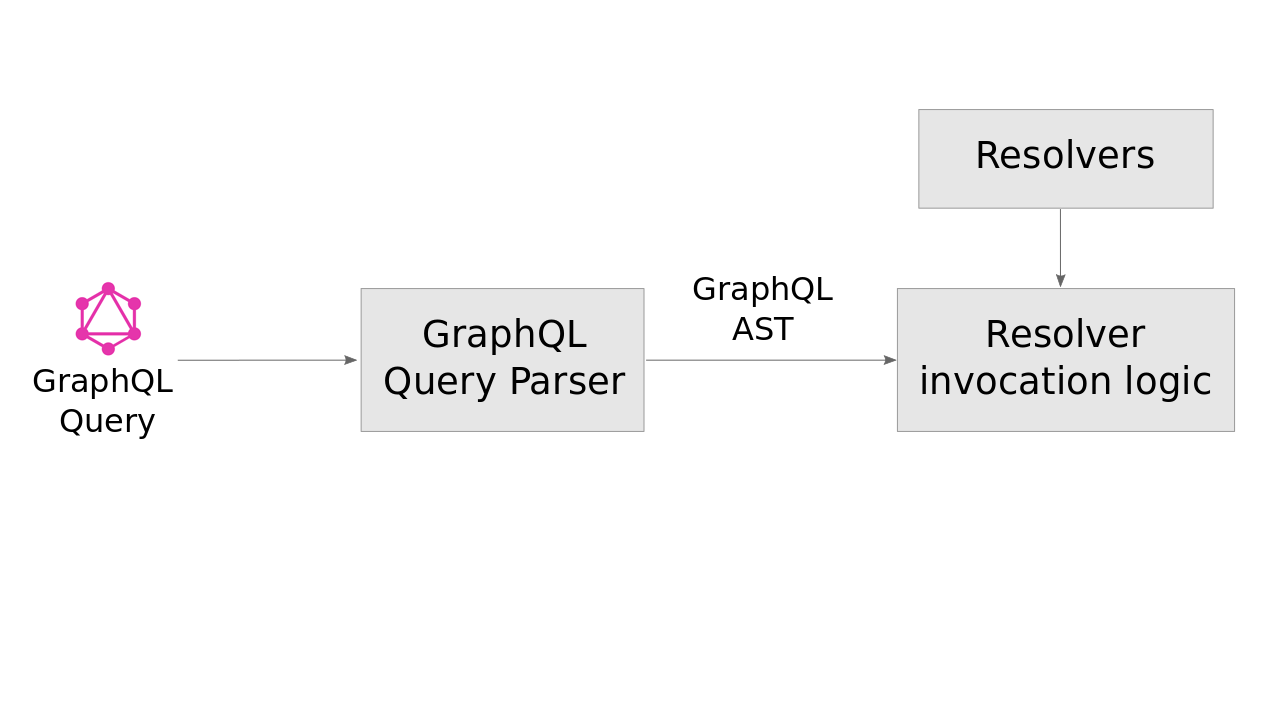
Many libraries help you parse the GraphQL query to GraphQL AST (example: https://github.com/apollographql/graphql-tag). However, you would have to write the resolvers along with their invocation logic.
Those who are already excited can jump straight away to build their own schemaless GraphQL. However, for those of you who are like:

We have good news for you!
What if you could query your databases from your clients using a GraphQL query like this:
query {
 articles(where: {author_id: "dan_abramov"}) {
  title,
  published_date
 }
}
And you get a response without writing any resolvers? Yes, you heard it right. That’s what Space Cloud helps you to do.
What is Space Cloud?
To keep things simple,
Space Cloud is an open-source web server which provides instant GraphQL and REST APIs on your database and microservices.
The coolest part about Space Cloud is that all the APIs are schemaless. Thus, you can query your databases and microservices via GraphQL without providing a schema.
Since Space Cloud also has a robust security module built into it, you can consume these APIs directly from the frontend. So in most use cases, just making an Angular or React app using the Space Cloud APIs should be the only code you write!
To show your support❤️, ️️ you can give us a star on Github.
Note: Space Cloud allows you to provide a schema as well and is optional. This schema acts as a data validation plane. However, it does not yet offer GraphQL introspection for autocompletion. You can create an issue for the same if you need it.
Getting started with schemaless GraphQL
In this guide, we are going to building a simple blogging application on top of MongoDB.
Note: Space Cloud works with SQL databases as well. Here we are using MongoDB since it is schemaless.
This blogging application will just have articles for the sake of simpplicity. We will be inserting a few articles into the database and query them back, all without providing a schema or writing any resolvers.
Note: Don’t worry if you get stuck somewhere. You can always ping me on our Discord channel.
Setup
We are using Docker Compose to run both Space Cloud and MongoDB for us.
Step 1: Get the docker-compose file
The spacecloud-io/space-cloud/install-manifests repo contains all installation manifests required to deploy Space Cloud anywhere. Get the docker-compose file from there:
wget https://raw.githubusercontent.com/spacecloud-io/space-cloud/master/install-manifests/quick-start/docker-compose/mongo/docker-compose.yamlYou should be able to see a docker-compose.yaml file with the following contents:
version: '3.6'
services:
  mongo:
    image: mongo
    restart: always
  space-cloud:
    image: spacecloud-io/space-cloud
    ports:
    - "4122:4122"
    - "4126:4126"
    depends_on:
    - "mongo"
    restart: always
    environment:
      ## The DEV environment lets you use Mission Control (Admin UI) without login
      ## Change the dev mode to false if you want a login to your Mission Control UI
      DEV: "true"
      ## Uncomment next lines to change the login credentials of Mission Control UI
      # ADMIN_USER: "admin"
      # ADMIN_PASS: "123"
      # ADMIN_SECRET: "some-secret" # This is the JWT secret used for login authentication in Mission Control
Step 2: Run Space Cloud & MongoDB
docker-compose up -dCheck if the containers are running:
docker psStep 3: Configure Space Cloud
If you exec into docker container of Space Cloud, you can see a config.yaml file generated by Space Cloud in the home directory.
Space Cloud needs this config file to function. The config file is used to load various information like which databases to use, their connection strings and security rules.
Space Cloud has it’s own Mission Control (admin UI) to configure all of this quickly.
Open Mission Control:
Head over to http://localhost:4122/mission-control to open Mission Control.
Note: Replace
localhostwith the address of your Space Cloud if you are not running it locally.
Create a project:
Click on Create a Project button to open the following screen:
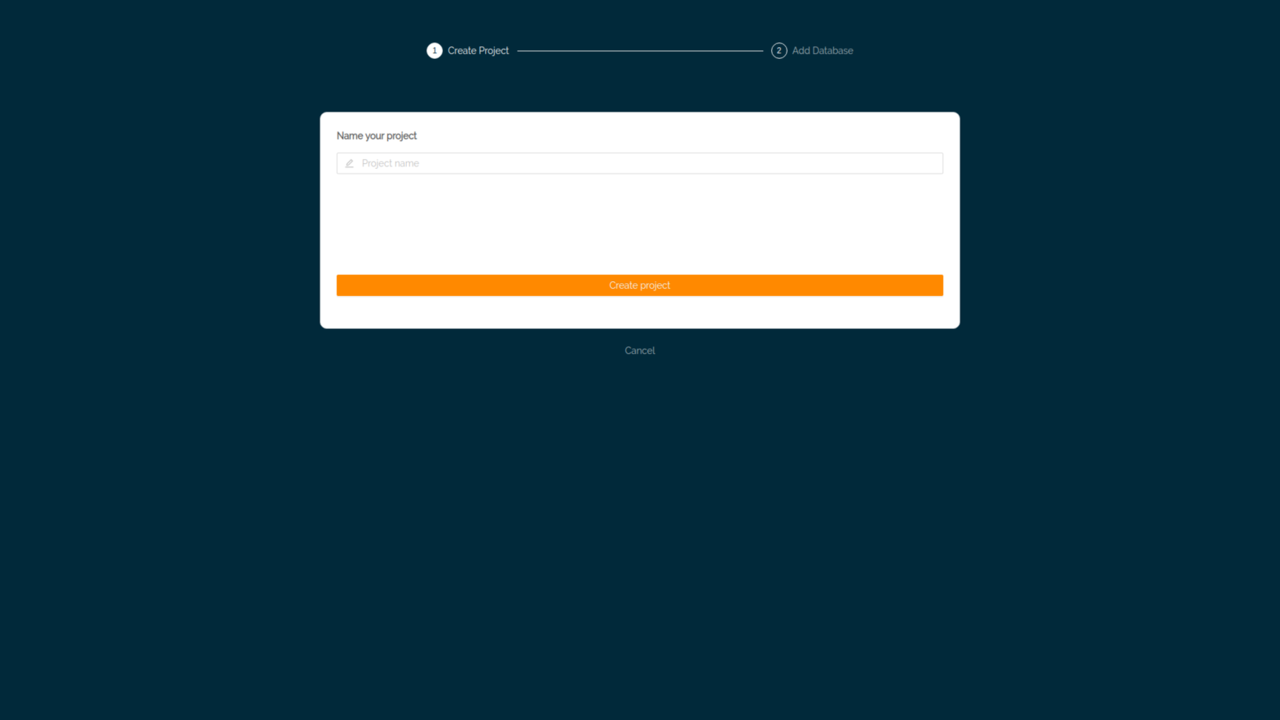
Give a name to your project.
MongoDB is selected as your database by default. Keep it as it is and hit Next to create the project.
Configure database module:
Head over to the Database section:
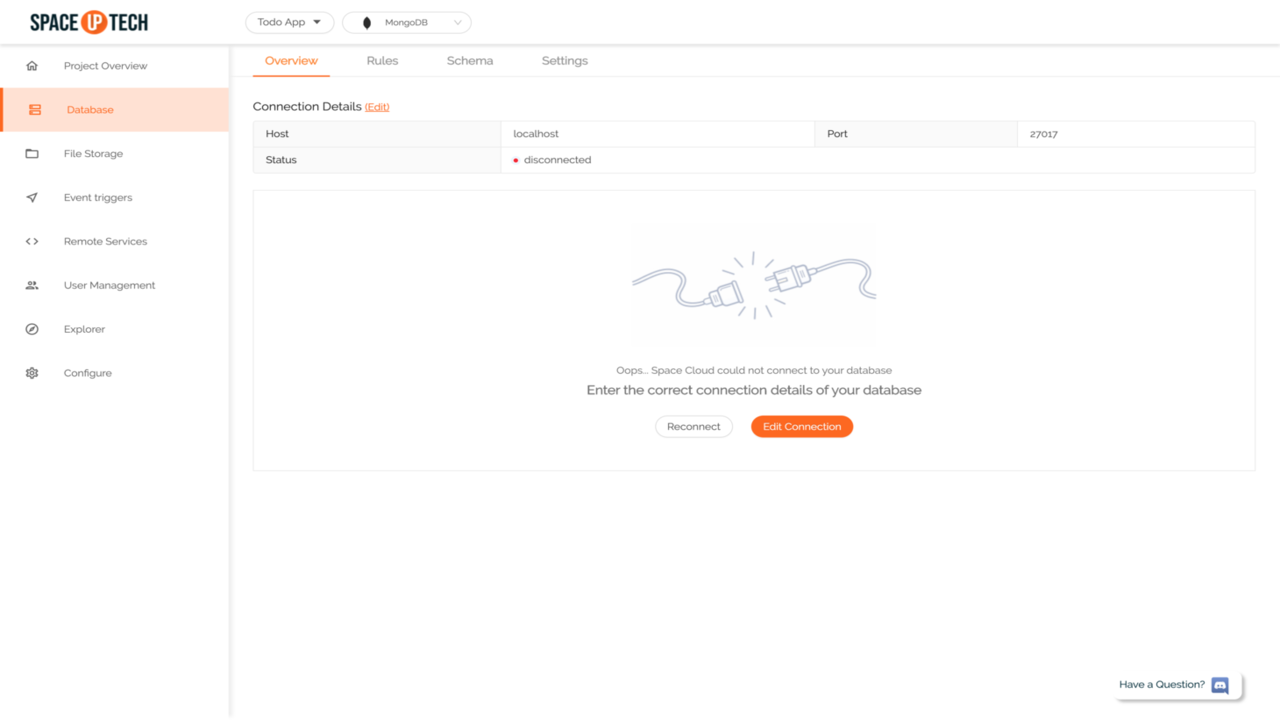
Click Edit Connection button to open the following form:
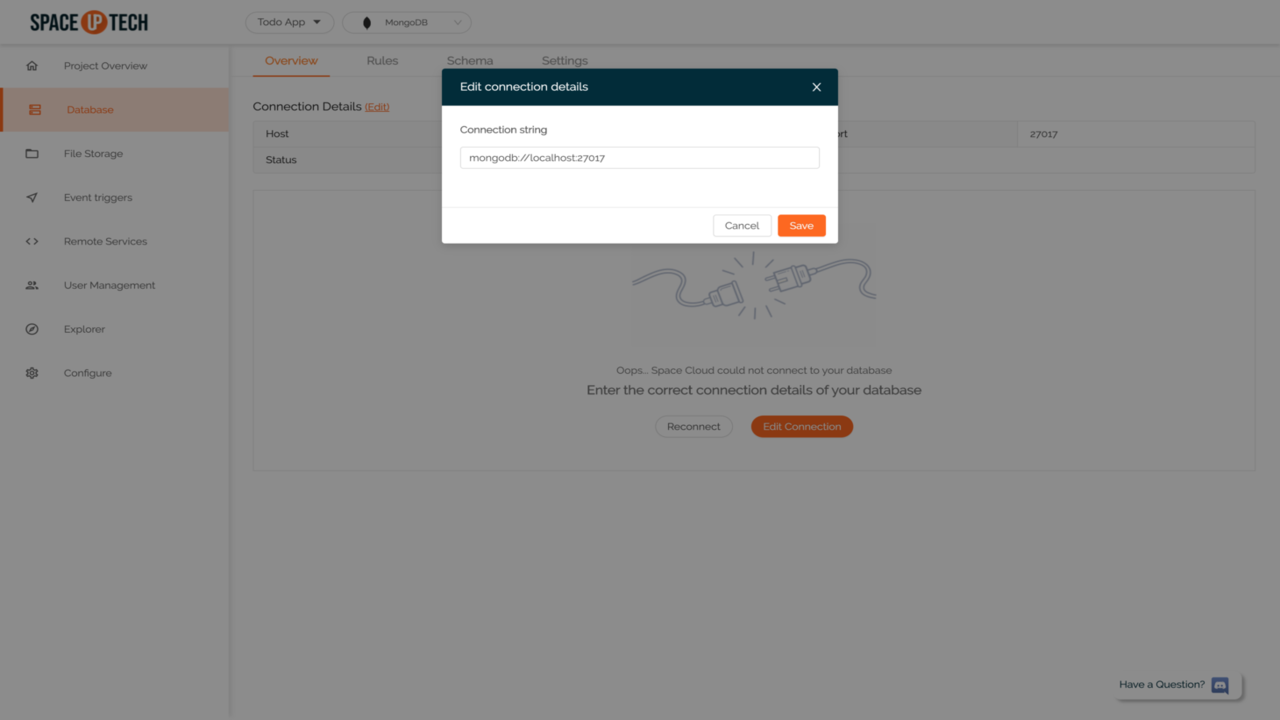
Copy-paste the following connection string in it:
mongodb://mongo:27017If the connection was successful, you should be able to see something like these:
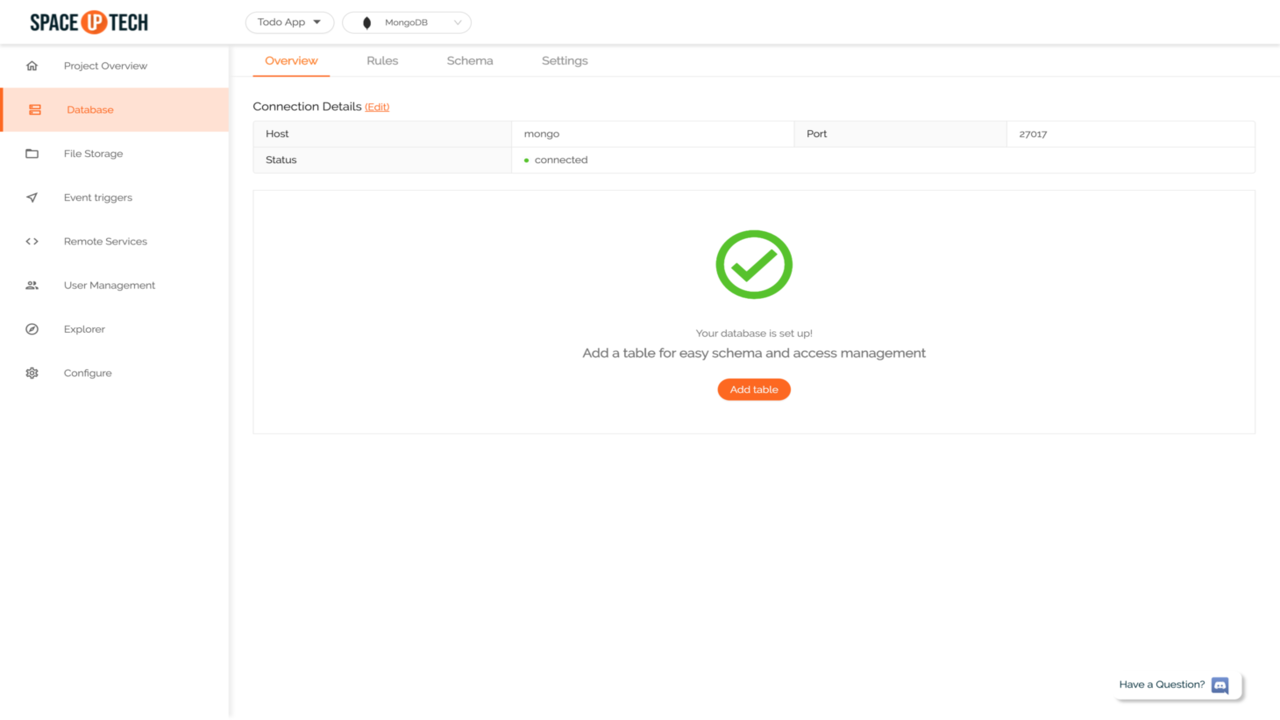
Great! That’s all that is required to configure Space Cloud. It’s time to play around with MongoDB using the auto-generated GraphQL APIs.
Running Schemaless GraphQL queries on Space Cloud
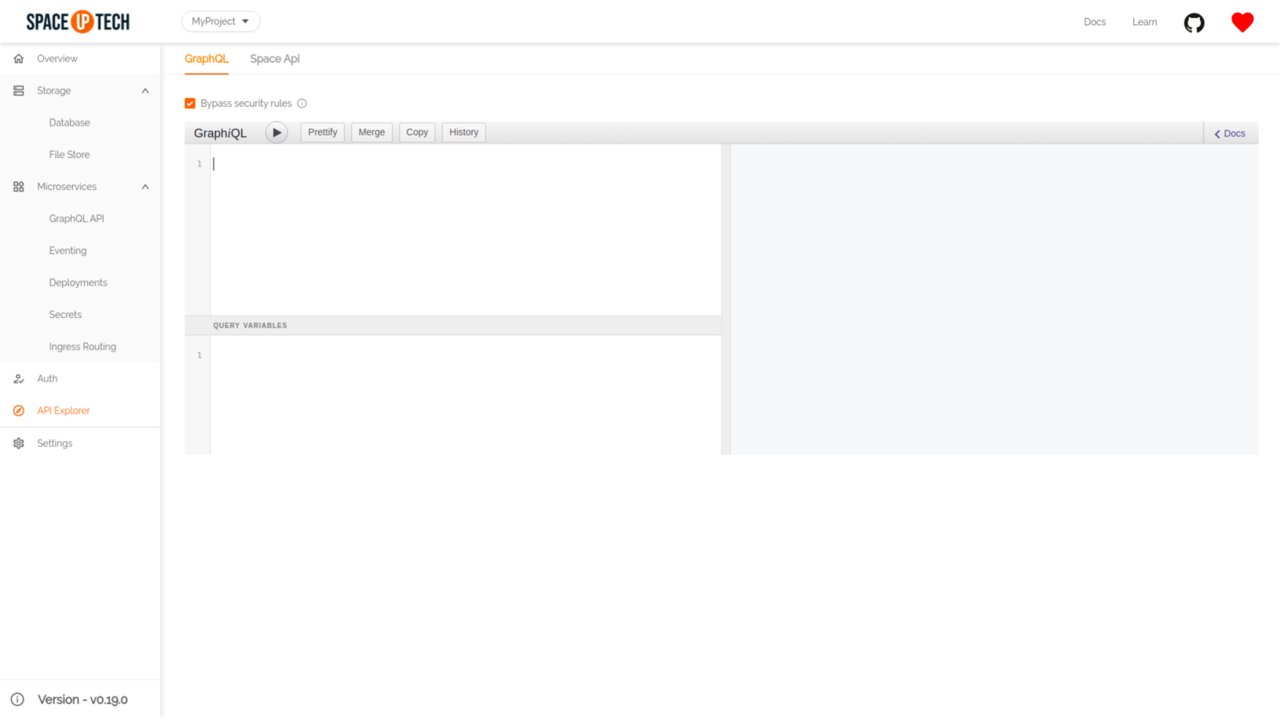
Mission Control has an embedded GraphiQL IDE which lets us fire queries without having to build a frontend.
Head over to the Explorer section.
Let’s start by creating some articles, which translates to inserting a few documents in your MongoDB using GraphQL.
Inserting data
Inserting data into our MongoDB is as simple as firing a GraphQL query for us. Try running the following GraphQL query to create few articles:
mutation {
 insert_article(
    docs: [
      { _id: "1", category: "Frontend", title: "Introducing Hooks" },
      { _id: "2", category: "Frontend", title: "React vs Vue" },
      { _id: "3", category: "Backend", title: "Securing microservices" },
      { _id: "4", category: "Backend", title: "REST to GraphQL" }
    ]
 ) @mongo {
   status
 }
}
On successful insert, you should be able to see the status as 200 which means you have successfully inserted the documents in your MongoDB.
The docs argument is nothing but the array of documents that you want to insert in your collection.
If you have noticed, we have used a @mongo directive in the above query. For Postgres or MySQL, change it to @mysql or @mysql respectively. And that’s it!
Note: The above GraphQL mutation will even work for SQL databases without providing a schema if the table
articleis already there in the database. Otherwise, the database itself will throw an error because of how SQL works.
Querying data with filters
Having inserted few articles, let’s try to query the articles of Frontend category back using GraphQL. It’s nothing but a filtering operation.
Try running the following query in the GraphiQL editor:
query {
 article (
   where: {category: "Frontend"}
 ) @mongo {
   _id
   title
 }
}
The response will look like this:
{
  "article": [
    {
      "_id": "1",
      "title": "Introducing Hooks"
    },
    {
      "_id": "2",
      "title": "React vs Vue"
    }
  ]
}
As you can see, we only got the articles that belonged to Frontend category. Check out this guide for a complete list of filtering options.
Adding schema
Space Cloud lets you optionally add schema via a GraphQL SDL for the following advantages:
- Data validation layer (example:
titleof anarticleshould always beString) - Creation of underlying Database schema (in case of SQL databases)
- Easy modelling of relationships
For example, the schema for our article collection can be:
type article {
 _id: ID! @primary
 title: String!
}
Note: The schema module of Space Cloud is optional and decoupled from its CRUD module. The schema module just acts as a data validation plane and helps create underlying database schema and infer relationships between data to make relational queries simpler. You can read more about schema modelling in Space Cloud.
Adding article schema
Head over to the Database section.
Click on the Add a collection button in the Database section to open the following form:
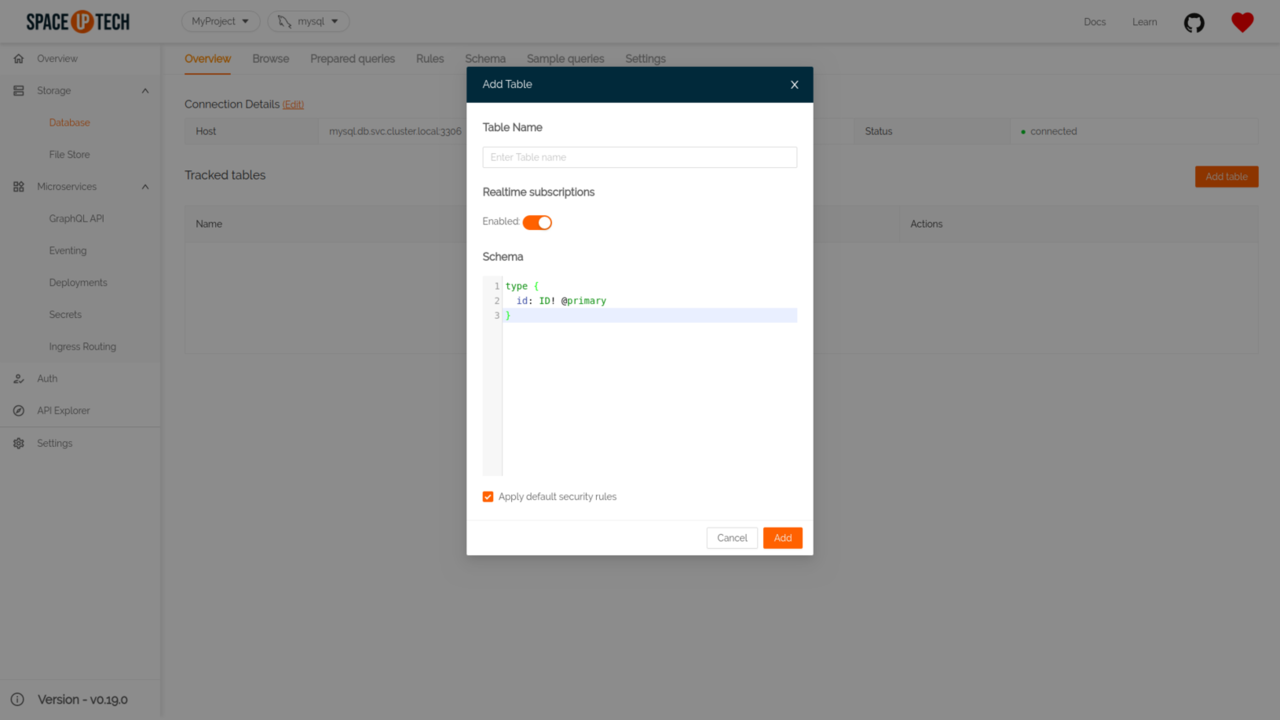
Give your collection name as article.
Copy-paste the following schema and hit save:
type article {
 _id: ID! @primary
 title: String!
}
Testing data validation
Having added the schema, let’s test whether the data validation is working or not. We will be purposely inserting documents into the article collection with wrong schema (title as an Integer).
Head over to Explorer section once again.
Try running the following GraphQL query:
mutation {
 insert_article(
   docs: [
    { _id: "1", category: "UX", title: "Best UX practices"},
    { _id: "2", category: "Frontend", title: 2}
  ]
 ) @mongo {
   status
 }
}
As you can see, we are trying to insert a document with title as 2, which violates the schema we mentioned. Thus our query will fail with the following error message:
"invalid type received for field title in collection article - wanted String got Integer"
Conclusion
We saw how you can implement schemaless GraphQL layer for yourself and how Space Cloud makes it easy for you. Space Cloud brings you the best of both worlds by allowing you to prototype rapidly without a schema and then later adopt schema when you want a more robust system.
There’s a lot more to Space Cloud like cross-database joins, transactions, file storage, eventing, remote services, etc. You can read more about the features of Space Cloud.
Show your support❤️ by giving it a star on Github.